Saturday 31 December 2011

works in progress post4

ah well here is a progect for 2012. A base and lanscape for my Tournament and challenge sets part dio part wargame terrain here is a plan of it on the plywood base

well just to show you that plywood is a good material. Look how the pieces line up. nice and uniform and it is less likely to warp

zoomed out shot. You all proberly recognise the wall and gate

part of it is set aside for the joust

the ruin slightly out of focus. You will note the block. This is the remains of the rest of the structure .

view of the other end othe ruined structure these blockes are made out of shaped pumice
So I have something to do this year you can follow this project on this site or on bennosfigureforum. I will put it under projects with the title Gowans tournament. Happy new year. And to any of you who think the world will end this year it better not or I'll only be able to see the first half of the hobbit :-P

Happy New Year

He He I was one of the first people in the world to feel 2012. Now it is 1pm here so I guess alot of you out there have just celebrated or are about to. :-D any way happy new year here in waiuku there was fireworks and parties as well as the local steam train wistle I bet they were going for the world record for the longest wistle ever made. :-D so many progects so little time many of the things I wanted done in 2011 cold not be finnished ah well I've got a whole year now eh ;-) but form jan 14-28 I am in Argentina on a school, spanish trip so No posts between those dates unless I get a laptop or my sister gets on here :-P but after that there will be pics of the trip so stick around.

Friday 30 December 2011

Works in progress post3

Ok is it done or nearly done? You decide. Personaly it is not done.

HERE IS THE (ALMOST) FINNISD "BUSSSTOP" , RUIN, STAND, STADIUM, THING...


ah there she is. My cup of tea, I don't get excieted over bussstops :-P
Hey where did my tea go I was going to drink that
It is not here
Or here
Or here
Well I cant find that cup of tea. Ah well at least the "bussstop", ruin, stand, stadium, thing is almost done :-D

Thursday 29 December 2011

Works in progress post2

Ok no figs this time but hey I have worked on the ruin...

So it is almost put together now. The Tube of paint in the background should give you a hint as to the colour of the roof :-P

Still a bit of drybrushing to do but it looks ok. GRRR that mold line is still there

Even as I was taking these pictures I could not resist the urge  to add vines growing up the ruin. They are made from Lichen that I painted green and, as is plain to seee, applied with a bit of PVA
Well there you have it not much work has been done on the figs though. Oh and any of you who were interesetd in the maps I was doing for my RPG sorry no progress to report I have other things like this ruin to do.

Wednesday 28 December 2011

Works in progress post1

Ok well I thought that maybe I should start a new topic on my blog. One that people could enjoy to look at and respond to. After not much thought I came up with a work in progress thread. Here you can see what I am up to and make comments on what I should do next, give me tips, ask for advice or make a special request. Like one of the figs be made in your likeness :-P

So Here is the first shots of my work in progress...


This is part of the stands for the Italeri Medieval Challange set. Basicaly this part  is done but the rest needs doing

Here is the ruins thet go with it I am going to move onto drybrushing the stone work. Then  adding some other texture like moss growing in the mortar. Then the roof and assembley

The quintain I've added a scratch built shield

Oh I forgot to show you the wood texture I added to the stand.
Now onto some figs...

A mixed bag here some English archers and a English man-at-arms. A French man-at-arms. All of which will make their way into my wizards army for my RPG. Also Finnaly I have a Thracian who is likely just to become a generic barbarian. 

A nice close up on the Thracian and his shield. I really like this pattern and would like to hear your advice on this. He is a HaT figure and I don't know why when I look at him why HaT have a "bad" reputation.
so here if the first work in progress post. I am working on more stuff alot more but this here is what I am doing today. I am hoping to finnish everything you see above soon. The Tournament stands this week if I am luckey :-D

Tuesday 27 December 2011

Knight

Here is a little man from my Italeri Medieval Tournament he is one of the french knights. So he is now a standard bearer for the wizards, one more thing is that he is the first fig that I primed before I painted. :-D I finnaly got some acrilic primer (For Christmas :-D I also got some other useful stuff). So without further adoo here he is!

Close up on his face. Look I have done his eyes :-D

Oh this guy is fussy he says that I didn't get the picture from the right angle

Front

Back

Detail on sword
So I hope you all enjoyed christmas. Some of you may have got all those useful things you needed, Like I did. Some of you may have got those figs you wanted all year. I did not :-( I cant seem to get hold of any figs from Valdemar. But I know some of you got both and some got none but hey thats life. So Look forwards to the new year. Oh I should mention that it is summer here so to all of you in the northern hemisphere don't expect to much from me, as I am likely to be on the beach :-P

Saturday 24 December 2011

Merry Christmas

It is I Gowna bearer of fire, bringer of death Oh and christmas cheer :-D
Felic Navedad. I hope you all have a merry christmas and a happy new year.

Thursday 22 December 2011

The link to the File has been changed

OK now this is the new link you want I've done a bit of edditing and I've added the first 2 maps of Terra incognita
The updated PDF
Have a good look It's now 10x better

How to: weapons from chicken wire and paper ;-D 2 the details

Ok now comes the hour we test our meddelers courage. Here is my continued tutorial on how to make weapons out of chicken wire and paper. But this time I will focus on the details and how to make use of both of the previous techniques on making swords to full effect to make the best looking sword around :-D

First up it is How To... make more details on a sword with just cheap and simple materials ;-)
You will need... A sword you prepared ealier, PVA glue and some "white out", "twink", "pen eraser", whatever you call it
Step 1: Put a little Pva glue on the areas shown, I don't know what they are called but is is the pommle?
then when the glue is starting to set add the first layer of twink/ white out.
Step 2: Once the first layer of twink/white out has set apply another one so that you build up these areas. Look at the top one see how it is starting to get that roung shape. I recomend that once this layer is dry you coat it in a wash of PVA and water to harden it if needs be
Once everything has dried take a look. Does it look right to you? If not add more layers or file back the ones you've made. I recomend that if the sword is going to go in a ring hand you do not to the top pommle, what ever it is called. Also I used white out because it was cheap I got hold of one pen of it and a little bottle of it for just $2 at the dollar shop. You could use "Green Stuff" but a tube of that I bought for $14 so you can clearly see the savings
Next up is the string for a bow
This next tip is similar to Paul's one but I've used a slightly different material and one that you really don't have to use I just used it for fun and because there is so much of it lying around.
Right get that cross bow you made earlier. Some PVA and some very thin string thread or hair. 
Todays hair comes from the huge amount left behind by my very funny dog Oscar!
Step 1: Get somthing to hold the cross-bow in place. Add a bit of PVA glue to the stock and the ends of the now arms. next put the thread hair or string onto the bow, make sure it touches the PVA. Leave to dry
Step 2: Once dry you can take the bow out of whatever was holding it and trim off any extra thread, hair or string. hey guess what all you need to do now is paint and your done. If you want you could add an arrow to the cross bow but there are other tutorials for this so I won't carry on.
And last but not least we have the best looking sword. I made a broad sword here but you could make any sword with this method. The first few pictures are the same as before but that is because the first few steps are the same...
Step 1: You don't need any new equipment just the same as before so... Firt cut out.
Step 2: Scale it
Step 3: Hammer flat and shape
Now things change...
Step 4: Cut out a bit of paper fold it in half. Open it up apply PVA put sword in the middle of one half  and fold  both sides together and press together as shown. Leave to dry.
Step 5: Once dry cut to shape, bath in plastice glue, once the glue is dry add other details if desired, paint and done! 
And there you have it details and improved swords here is a finnal picture showin them all lined up
Not bad eh ;-D
So once again a chep and easy way to produce weapons on the cheap. I hope that some day soon I will be able to do another tutorial but my school trip/spanish trip to Argentina draws near and so to does my need to prepare for that. But anyway hope these prove as useful to you as they did to me. :-D

Wednesday 21 December 2011

How to: weapons from chicken wire and paper ;-D

Ok well recently moved into my new home, started getting my stuff in order and looking around for stuff left behind that could be usefull for modelling. So today I went to the bottom of the garden and fount some chicken wire that had been used in a fence but the person who put is there forgot to cut the excess off but hey now I'm using it :-D

Ok I can imagine that many of the things that are included in this how to have already been used by the people viewing this blog but for those that don't know these methods here is a tutorial. It is mainly to show how to make swords out of chicken wire and paper but I have included how this method can be adapted for making a cross bow and how to make a sword without the paper... In another tutorial I will explain how to add other details to these weapons :-D but for now here is the basics...

You will need... Chicken wire, scissors, plires, wire cutters, normal paper, PVA glue, Plastic glue a hammer (not shown), newspaper, paint, a hard surface (prefrebly an anvil (not shown, or owned) and paint.

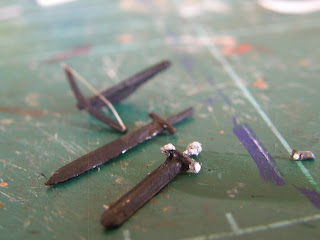
Step 1: cut the chichen wire into pieces, using the wire cutter, these pices should be a rough representation of the weapon you want to make. i.e Swords like in this case should be like little crosses.
Like this one :-D
Step 2: Make sure it is to scale. I feel that it is so moving on then...
These next few steps include a technique I got off Paul! It is essencialy his how to make a paper halbard but adapted for swords.
Step 3:Right if you have seen Pauls tutorial you just need to look at the images if not...
Cut  out a bit of paper ,  fold  in half, open it up and put the "Blade" in the middle of one of the halves, take the blade out and apply a bit of wood glue to the paper, put the blade back fold the paper over again, press halves together, wait for glue to dry and cut into this shape.
Step 4: Bath in plastic glue and stand it up, I stuck it in news paper but I imagine foam or cork is good. Leave it to dry, you will find when it's dry it is rock hard this is thanks to the plastic glue. 
The sword is now complete all you need to do is paint. :-D nice and simple, for those of you want something more complex I will add another "How to" in which I will discuss who to add details, and basicaly complicate the whole thing :-P But here is a few variations...
Cross bow
The edges os the wire are only slightly even so it is easy to make a cross bow
1. Cut out a T shaped bit of wire
2 Bend the top of the T to make it look like a bow
3 cut out a piece of paper and fold it over the main part of the cross bow.
4 Put some PVA on the paper and then fold it over the bow. I recomend you try add another bit of paper just so you double the thickness this is mainly for aesthetical/proportional reasons.
Leave to dry.
6 Once dry cut to shape if you don't know what this is look at an illistration of a cross bow.
7 Bath is plastic glue and leave to dry solid.
8 Paint and add bow strings ( I will hopefully include a tutorial on that in the next post).
Sword without the paper
To make this just follow the first 2 steps for making the other sword then these
Step 3: put blade on a hard surface, I recomend an anvil.(I used concrete :-P)
Step 4: Hammer the blade flat, do this on both sides.
Step 5: Straiten the blade out with plires.
Step 6: Use the wire cutters to make the blades point.
Step 7: Paint :-D
Ok here they all are side by side so that you may compare them.
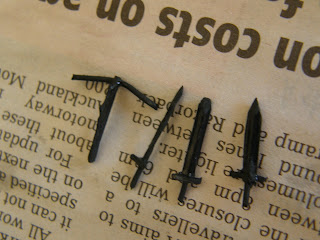
From Left to Right... Paper and wire cross bow, just wire sword (its at an odd angle :-( ), paper and wire sword , paper and wire sword
And there you have it an easy and cheap way to mass produce weapons :-) I will include another tutorial to explain how to make these more detailed and how to combine both methods of making swords to get the best results.

Tuesday 20 December 2011

Cultists Vs wizard and knights

If you have read my pdf you know what this is about if not read :-P. The evil cultist worloard now strives to kill the great wizard Nilrem and his accomplis Lord Ruhtra and his knights of the square table.
They charge their warcries fill the air with anger

Ok this is an example of my fathers camera in action... Here is it in normal photo mode

in macro mode

in super macro look at the image quality. It shows all the mistakes I make very well

The cultists carrying out their orders while the warlord calls for rienforcements.

more cultists this one seems to come from gondor :-P

They close lances at the ready swords waving in the air

The wizard orders the cavalry to form a wedge

Nilrem the powerful carrying the great golden staff

Lord Ruhtra flanked by his knights

Notice this knight's horse. It has a strange tail. The tail is scratch built because the origional fell off.

So they charge into one anouther who will win the day? Who knows all I know is that those cultists are ountumbered